In the previous article, we described how to build a simple Android executable, which uses Boost C++ libraries. This is good example to see how the process works and to understand the internals; however, for practical purposes we need to know how to build ready-to-use Android applications which can be submitted to Google Play Store, for example.
The officially supported way to create such applications is with the help of Android Studio. Unfortunately, Android Studio don't support native-enabled applications as good as it does Java-based applications. NDK support is very limited at the current moment. Thus, the only supported NDK applications are those consisting of just one module (final shared library) built from the sources located in the 'jni' folder, without any dependencies, without splitting by modules (e.g. to a set of static and shared libraries), etc. There is no ability to do customizations (except for very limited set of options), available for developers in the gradle script used by Android Studio to build Android applications:
defaultConfig {
        ...
        ndk {
            moduleName "my-module-name"
            cFlags "-std=c++11 -fexceptions"
            ldLibs "log"
            stl "gnustl_shared"
            abiFilter "armeabi-v7a"
        }
    }
}
The only supported settings for NDK build are moduleName, cFlags, ldLibs, stl and abiFilter; we can't specify additional dependencies (such as Boost libraries) here. We also can't specify a set of paths to instruct the linker where to search libraries, as well as many other settings.
This happens because gradle plug-in (used by Android Studio to build the projects) ignore existing Application.mk and Android.mk from the 'jni' folder. Instead it generates its own Android.mk on the fly, using settings from the build script.
Practically, the only working way to build fully featured NDK-enabled applications in Android Studio would be to completely disable its limited NDK support and call the $NDK/ndk-build command explicitly. Here we'll describe step-by-step how to do it.
We'll create a simple Android application in Android Studio from scratch, and then add native parts there. We assume you already have installed Android Studio and set up the Android SDK; we also assume you've downloaded and unpacked CrystaX NDK somewhere on your computer.
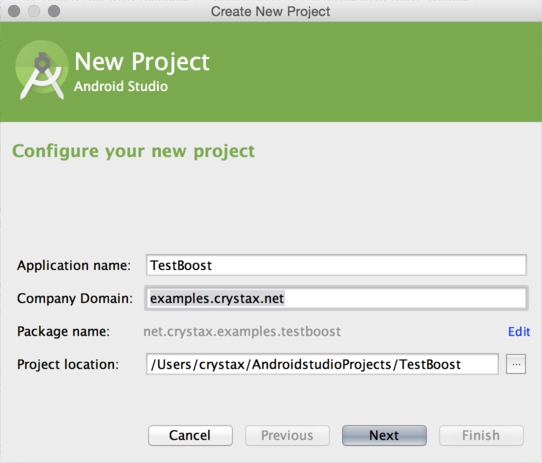
First off, open Android Studio and create a new Android project there:
Select "Android 4.0.3" target:

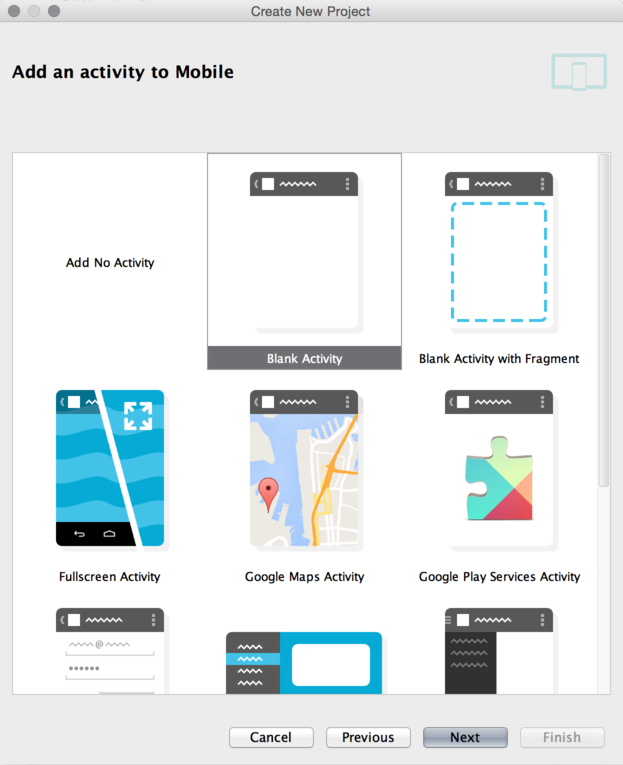
Select blank activity:
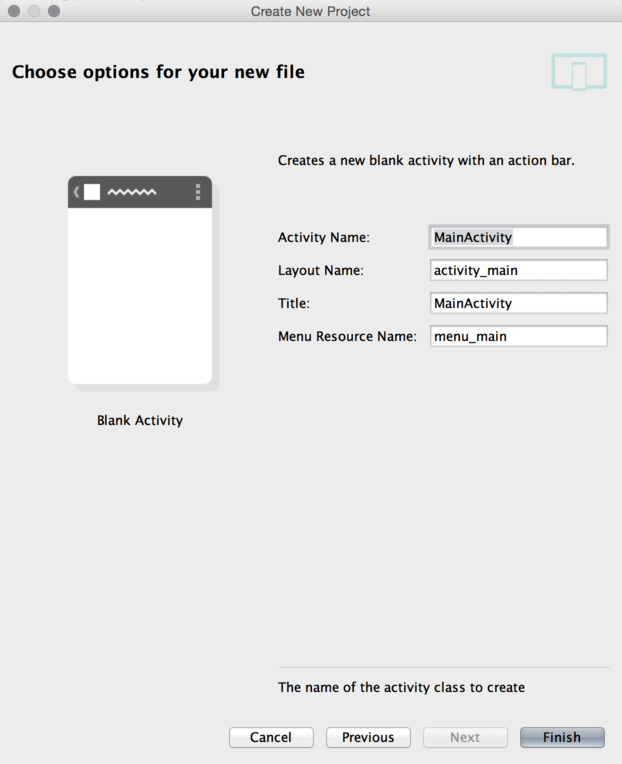
Accept default names and press the "Finish" button:
Now, modify app/res/layout/activity_main.xml so it looks like the following:
<RelativeLayout xmlns:android="http://schemas.android.com/apk/res/android"
    xmlns:tools="http://schemas.android.com/tools" android:layout_width="match_parent"
    android:layout_height="match_parent" android:paddingLeft="@dimen/activity_horizontal_margin"
    android:paddingRight="@dimen/activity_horizontal_margin"
    android:paddingTop="@dimen/activity_vertical_margin"
    android:paddingBottom="@dimen/activity_vertical_margin" tools:context=".MainActivity">

    <TextView android:id="@+id/text"
        android:layout_width="wrap_content"
        android:layout_height="wrap_content"
        />

</RelativeLayout>
Add the following lines into your MainActivity.onCreate():
TextView field = (TextView)findViewById(R.id.text);
field.setText(getGPSCoordinates(getFilesDir().getAbsolutePath()));
Add declaration of native method into MainActivity class:
private native String getGPSCoordinates(String rootPath);
Also, don't forget to add loading of the native library to the static initialization block:
static {
    System.loadLibrary("test-boost");
}
Final content of MainActivity.java should be as below:
We have finished with Java part of the application; let's switch to the native part now.
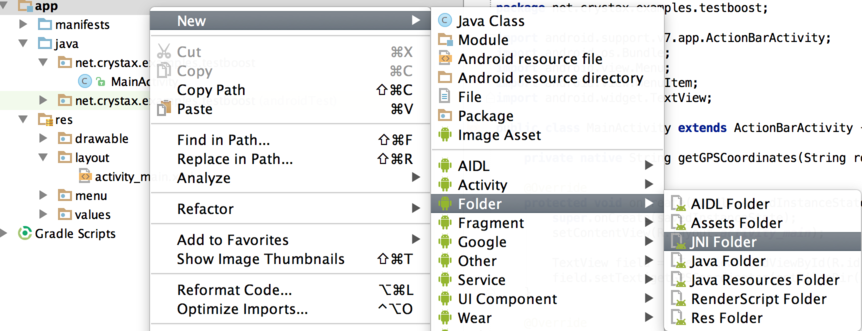
Create the folder where native sources will be located:
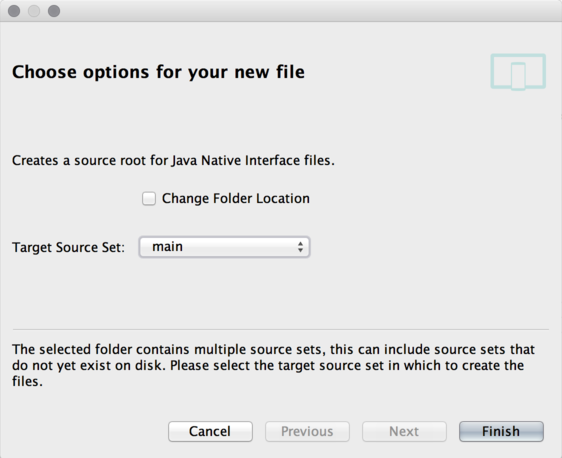
Use the default 'main' source set in next window and press the "Finish" button:
Create the following files in the just-created folder (app/src/main/jni):
Now, we need to modify the build script to allow building the native part as well as the Java one. To do that, we first need to open local.properties and add the path to the CrystaX NDK, like below:
sdk.dir=/opt/android/android-sdk-mac
ndk.dir=/opt/android/crystax-ndk-10.1.0
For Windows users, backslashes and colons in the path should be escaped:
sdk.dir=C\:\\android\\android-sdk-mac
ndk.dir=C\:\\android\\crystax-ndk-10.1.0
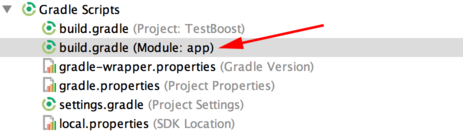
And, finally, open and edit build.gradle:
Make it to be exactly like the following:
Here is the diff for those who are interested what exactly we've added to build.gradle:
diff --git a/build.gradle b/build.gradle
index a6b8c98..08dce1c 100644
--- a/build.gradle
+++ b/build.gradle
@@ -1,3 +1,5 @@
+import org.apache.tools.ant.taskdefs.condition.Os
+
 apply plugin: 'com.android.application'

 android {
@@ -17,9 +19,50 @@ android {
             proguardFiles getDefaultProguardFile('proguard-android.txt'), 'proguard-rules.pro'
         }
     }
+
+    sourceSets.main.jni.srcDirs = [] // disable automatic ndk-build call, which ignore our Android.mk
+    sourceSets.main.jniLibs.srcDir 'src/main/libs'
+
+    // call regular ndk-build(.cmd) script from app directory
+    task ndkBuild(type: Exec) {
+        workingDir file('src/main')
+        commandLine getNdkBuildCmd()
+    }
+
+    tasks.withType(JavaCompile) {
+        compileTask -> compileTask.dependsOn ndkBuild
+    }
+
+    task cleanNative(type: Exec) {
+        workingDir file('src/main')
+        commandLine getNdkBuildCmd(), 'clean'
+    }
+
+    clean.dependsOn cleanNative
 }

 dependencies {
     compile fileTree(dir: 'libs', include: ['*.jar'])
     compile 'com.android.support:appcompat-v7:21.0.3'
 }
+
+def getNdkDir() {
+    if (System.env.ANDROID_NDK_ROOT != null)
+        return System.env.ANDROID_NDK_ROOT
+
+    Properties properties = new Properties()
+    properties.load(project.rootProject.file('local.properties').newDataInputStream())
+    def ndkdir = properties.getProperty('ndk.dir', null)
+    if (ndkdir == null)
+        throw new GradleException("NDK location not found. Define location with ndk.dir in the local.properties file or with an ANDROID_NDK_ROOT environment variable.")
+
+    return ndkdir
+}
+
+def getNdkBuildCmd() {
+    def ndkbuild = getNdkDir() + "/ndk-build"
+    if (Os.isFamily(Os.FAMILY_WINDOWS))
+        ndkbuild += ".cmd"
+
+    return ndkbuild
+}
The source file tree of the TestBoost/app folder should look like the following:
.
├── app.iml
├── build.gradle
├── proguard-rules.pro
└── src
    ├── androidTest
    │   └── java
    │       └── net
    │           └── crystax
    │               └── examples
    │                   └── testboost
    │                       └── ApplicationTest.java
    └── main
        ├── AndroidManifest.xml
        ├── java
        │   └── net
        │       └── crystax
        │           └── examples
        │               └── testboost
        │                   └── MainActivity.java
        ├── jni
        │   ├── Android.mk
        │   ├── Application.mk
        │   ├── gps.cpp
        │   ├── gps.hpp
        │   └── test.cpp
        └── res
            .......
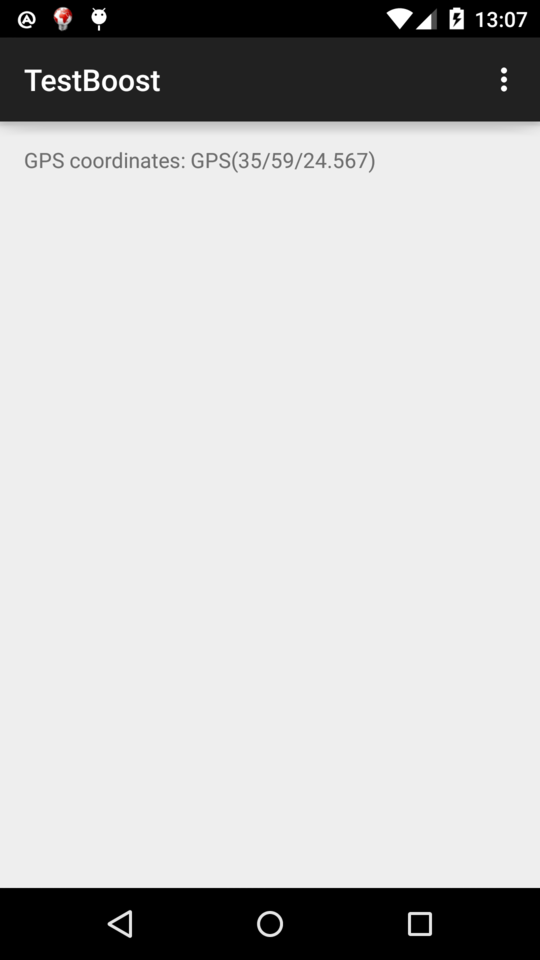
That's it! Now build the project as usual (Build -> Make Module 'app') and run it on the device. Here is a screenshot of the running application: